Kaip dauginti obelį
Turinys:
Obuoliai yra bene gausiausias rusų sodų gyventojas. Ir kiekvienas sodininkas mėgėjas, be abejo, turi savo mėgstamą obuolių veislę, kurią norėtų turėti savo ūkyje. Ir kartais reikia atnaujinti sodinimus, tačiau nenorite prarasti širdžiai brangių obuolių veislių. Tada sodininkui kyla klausimas, kaip dauginti obelį? Šiame straipsnyje apžvelgsime populiariausius obelų dauginimo būdus, atkreipdami dėmesį į kiekvieno metodo privalumus ir trūkumus.
Kaip dauginti obuolį sėklomis
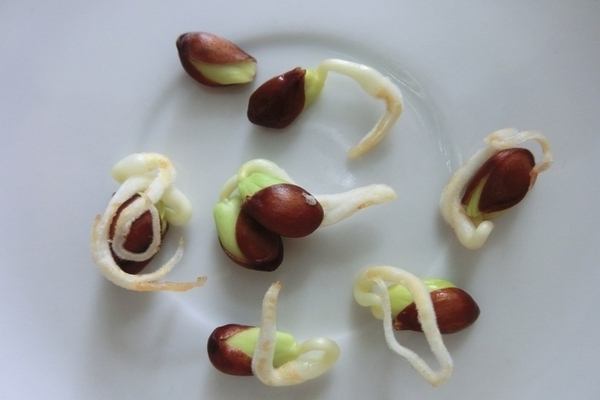
Šis metodas nėra labai populiarus tarp sodininkų mėgėjų. Greičiau jį naudoja profesionalūs veisėjai, kai kuriamos naujos veislės. Taip yra dėl to, kad daugeliu atvejų iš sėklų išaugęs augalas neturi motiniškų savybių, o greičiau bus laukinė obelis.
Toks augalas yra įmanomas ir duos vaisių, tačiau neįmanoma nuspėti, koks bus obuolių skonis. Tokius medžius patartina naudoti kaip atsargas, tačiau jie pradės derėti po 7–9 metų. Tačiau tokios sėklų atsargos užauga pakankamai aukštos, jos nėra įnoringos ir produktyvios.
Norint gauti kuo didesnių kultūrinių savybių turinčių sėklų, reikia paimti dviejų augalų žiedus ir „pasikeisti“ jų žiedadulkes. Sėklos, gautos taip maišant, įgis abiejų augalų savybes. Tačiau gaila, tačiau ne visos „tėvų“ augalų savybės yra išsaugotos, o apdulkinimo procesas yra gana sunkus. Todėl greičiausiai nėra prasmės naudoti šį savo vietovėje esančių obelų reprodukcijos metodą.
Kaip dauginti obelą auginiais
Šį metodą galima suskirstyti į du porūšius
Naudojant auginius kaip atžalą
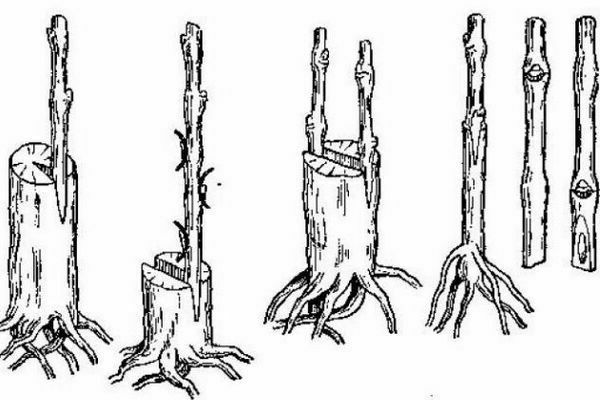
Norėdami tai padaryti, jums reikia auginių, surinktų iš jaunų ūglių (pirmaisiais metais). Jie nupjaunami nuo medžio tą pačią dieną, kai planuojamas skiepijimas. Ateityje auginiai nebus naudojami. Todėl auginių imama tiksliai tiek, kiek tą dieną planuojate naudoti.
Visos lapijos turi būti pašalintos iš auginių ir įskiepytos į išteklių šaknis. Tokiu atveju skiepijimo vietos nereikia per daug apibarstyti žeme. Priešingu atveju pjovimas gali duoti nepriklausomas šaknis ir skiepijimas bus nesėkmingas.
Šiuo atveju laukiniai augalai geriausiai tinka kaip ištekliai. Jie yra nepretenzingi, prisitaikę prie vietinių klimato sąlygų, gerai toleruoja žemą neigiamą temperatūrą. Norėdami pasirinkti akcijas, turite atsižvelgti į:
- jei ištekliai nėra aukšti, geriau į juos skiepyti stulpelinių obelų auginius.
- geriau skiepyti aukštų veislių obelų stiebą į sėklų išaugintą sultinį.
Šiauriniuose mūsų šalies regionuose, kur yra ilgos ir atšiaurios žiemos, dėl kurių dažnai užšąla obelys, taip pat galima skiepyti į nykštukinį išteklių.
Tokie poskiepiai auginami specializuotuose medelynuose.Jie yra suskirstyti į super nykštukus, nykštukus, pusiau nykštukus. Sodindami tokį poskiepį, įsitikinkite, kad šaknies kaklelis yra 4-5 cm virš žemės lygio. Tokiu atveju skiepijimo vieta bus dar keliais centimetrais aukščiau. Nykštukinių obelų šaknis reikia gilinti labiau nei įprastai, o pati obelis turi būti pririštas prie atramos.
Pavasarį būtina skiepyti rankena, o vasaros pabaigoje - pumpuru.
Obuolių, įskiepytų į nykštukinį poskiepį, savybės priklausys nuo abiejų medžių savybių.Tačiau galima išskirti pagrindines daugumai jų būdingas savybes: tai geras derlius ir kompaktiška laja.
Tarp trūkumusbūdingas obelims, auginamoms ant tokio poskiepio:
- prastai išvystytos šaknys;
- mažas atsparumas sausrai;
- dirvožemio sudėties tikslumas;
- padidėjęs medžio trapumas.
Bet jei požeminis vanduo jūsų sode yra labai arti žemės, galite auginti visą sodą nykštukinių obelų.
Dauginimas šaknų auginiais
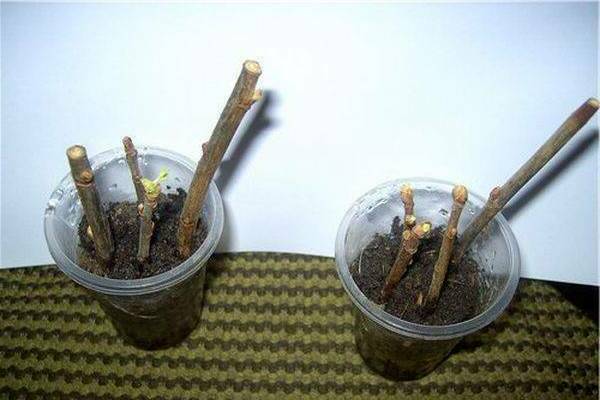
Šis metodas yra vegetatyvus ir leidžia išsaugoti visas motininio augalo savybes. Taigi obelims, išaugintoms iš šaknų auginių, skiepyti nereikia.
Sodinimo medžiaga šiam metodui paruošiama pavasarį, dar prieš pumpurų žydėjimą, arba rudenį. Auginiai turi būti apie 20 cm ilgio Paruošti auginiai sodinami į žemę (vagose) iki 2-3 cm gylio nuo pjūvio. Tuo pačiu metu pastebimas 25-30 cm atstumas tarp augalų ir 1 m eilių.
Po pasodinimo daigus geriau šiek tiek pavėsinti, o žemę padengti mulčio sluoksniu, pavyzdžiui, humusu. Nepamirškite reguliariai laistyti savo sodinukų. Įsišaknijusius sodinukus rudenį galima persodinti į nuolatinę vietą.
Ar galima dauginti obelį šaknų atžalomis
Šis metodas nėra labai populiarus, nes iš šakniastiebių auga tik poskiepis, į kurį ateityje skiepijama jums patinkanti veislė.
Norėdami gauti šaknų atžalų, turite pasirinkti motininį medį. Jis turėtų būti jaunas ir pakankamai sveikas, gerai vaisingas. Pasirinktas medis šiek tiek supjaustomas ir įkasamas, padengtas dirvožemiu. Po kurio laiko atsiranda baziniai procesai. Palikuonys, esantys tam tikru atstumu nuo motininio medžio, laikomi tinkamiausi transplantacijai.
Galite atskirti jaunus palikuonis ir pasodinti juos į nuolatinę vietą 1-2 metų amžiaus pavasarį ar rudenį. Transplantacijai tinka tik šaknų čiulptukai su išsivysčiusiomis šaknimis.
Tarp šio metodo trūkumų reikėtų pažymėti, kad jis labai susilpnina motininį medį, o palikuonys gerai neįsišaknija naujoje vietoje. Ir tarp privalumų yra tai, kad šaknų palikuonių metodas leidžia vienu metu gauti kelis jus dominančios veislės sodinukus.
Kaip dauginti obelį sluoksniuojant
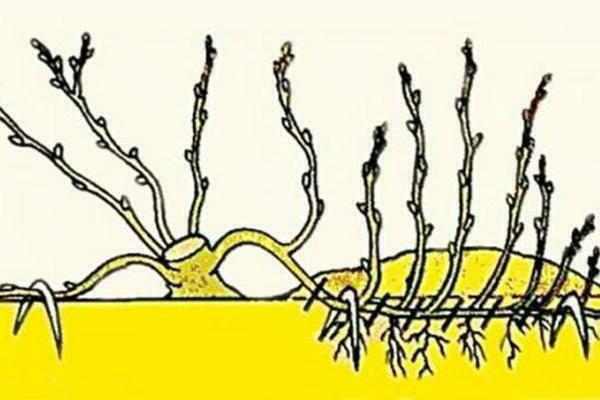
Šis metodas iš esmės panašus į krūmų dauginimą lenkiant ir įsišaknijant šakas. Veiksmų schema šiuo atveju yra maždaug tokia pati. Pirmųjų gyvenimo metų šakos išvalomos nuo lapų 25-30 cm aukštyje nuo viršaus. Toje vietoje, kur ūgliai palies žemę, padarykite skylę, užpildykite ją smėlio ir sodo dirvožemio mišiniu, sulenkite šaką ir sutvarkykite. Ūglio vainikas turi būti surištas taip, kad daigo formavimasis vyktų vertikaliai.
Kai pjaustytuvas sukuria savo šaknų sistemą (paprastai tai atsitinka vasaros mėnesiais), jį galima padalyti su motininiu augalu ir pasodinti į nuolatinę vietą. Arba pirmiausia galite įdėti auginius, kurie davė šaknį, į gėlių vazoną ir kurį laiką augti namuose. Tada augalų aklimatizacijos procesas ateityje bus daug lengvesnis.
Šio metodo trūkumas yra tas, kad, skirtingai nei krūmai, medžių šakos auga aukštai nuo žemės, todėl sunku jas nulenkti. Be to, bendras laikas nuo nusilenkimo iki įsišaknijimo jau nuolatinėje naujo augalo vietoje trunka apie šešis mėnesius.
Iš profesionalų - galite sulenkti šakas įsišaknijimui ne tik pavasarį, bet ir ištisus metus (išskyrus žydėjimo laikotarpį ir karštas bei sausas dienas). Be to, gauto sodinuko nereikia skiepyti ir jis turi visas motininio augalo savybes.
Dauginti medį sulaužyta šaka
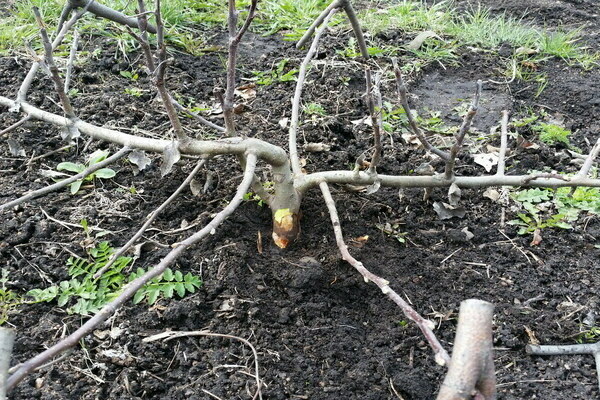
Iš esmės tai yra tas pats dauginimo būdas sluoksniuojant. Tai galima atlikti dviem kryptimis.
Pirmuoju atveju paimami pirmųjų gyvenimo metų ūgliai ir užkasami į žemę, pagilinami 10 cm taip, kad antžeminė dalis būtų 30–40 cm ilgio.Filialas pririštas prie atramos. Per visą augimo laikotarpį daigai laistomi, taip pat ravimi. Maždaug po metų šakos įsišaknys ir gali būti pasodintos į nuolatinę vietą (geriau tai padaryti rudenį).
Antruoju atveju žievė nupjaunama ant pasirinktos šakos 10 cm atstumu nuo augimo taško, o nupjauta vieta apdorojama šaknų formavimosi stimuliatoriumi. Tada pjūvis apvyniojamas medžiaga, kuri gerai sulaiko drėgmę (pavyzdžiui, samanos), o ant viršaus - plėvele. Po šaknies formavimo šaką galima persodinti į nuolatinę vietą.
Tokiu būdu gauti daigai išlaiko visas motininio augalo savybes, o vaisiai įvyksta per 3-4 metus.
Klonavimas kaip obelų dauginimo būdas
Šis metodas įgauna vis didesnį populiarumą.
Laboratorijoje klonavimas atliekamas dedant ląsteles į specialią maistinę terpę. Tada šias ląsteles veikia tam tikras hormonų rinkinys. Dėl to auga klonas - tiksli motininio augalo kopija.
Užauginti obelį reikia tik vienos žiemos. O pavasarį obelis galima sodinti į žemę. Tuo pačiu metu kopijų, kurias galima auginti kaip kloną, niekas neriboja. Šio jauno metodo trūkumai yra didelė jo kaina, taip pat didelė tikimybė, kad naujas augalas bus sunkus ir ilgą laiką bus „perkrautas“, nes jis buvo auginamas steriliomis sąlygomis ir jam trūksta imuniteto.
Namuose klonavimas yra vegetatyvinis dauginimas, kuris išsaugo visas motininių medžių veislių savybes. Galima klonuoti šaknų atžalomis. Jie lengvai atsiskiria nuo motininio augalo ir turi didelį išgyvenamumą. Gauti medžiai pradeda duoti vaisių po 4 metų ir duoda gerą derlių.
Taip pat galima įsišaknyti mažai augančioms šakoms. Norėdami tai padaryti, po šaka, kurią planuojate išrauti, galite įdėti indą su dirvožemiu. Įbrėžimai atliekami ant pasirinktos šakos žievės, toje vietoje, kuri yra nustatyta šaknų sistemos vystymuisi. Šie įbrėžimai apdorojami šaknų formavimosi stimuliatoriumi, o tada šaka sulenkiama į indą su dirvožemiu, pritvirtinama ir padengta žeme. Dėl to turėtų formuotis šaknys, tai bus klonuotas sluoksnis.
Kaip dauginti obuolį oro sluoksniais
Labiausiai paplitęs obelų veisimo būdas. Norėdami jį naudoti, jums reikia lignified ūglių. 20-30 cm aukštyje nuo ūglio augimo taško reikia pašalinti visus lapus ir šiek tiek supjaustyti žievę ratu. Pjūvis apdorojamas šaknų formavimosi stimuliatoriumi, apvyniojamas drėgmę sulaikančia medžiaga (gerai tinka samanos), o ant viršaus - plėvele ar izoliacine juostele. Laikui bėgant šaknys susidarys pjūvio vietoje. Ir sodinuką galima atskirti nuo motininio medžio ir pasodinti į žemę.
Apibendrinant reikia pasakyti, kad dauginti mėgstamos veislės obelį nėra taip sunku. Be to, kaip aprašyta aukščiau, tam visai nereikia daug laiko ir daug skiepijimo patirties. Tiesiog pasirinkite vieną iš jums tinkamesnių vegetatyvinių metodų ir pirmyn!